All requests must be authenticated using one of your organization’s API keys.
The HTTP request must include a header field in the form of Authorization: Basic {API-KEY}, where {API-KEY} should be replaced with your API key string.
Returns the [Model] object after a successful request.
Returns an error if request is invalid (for example, an invalid parameter or invalid api key).
Welcome! The Wodely API is a RESTful web service designed for developers and integrations to interact programmatically with Wodely’s data and real-time delivery management features.
It supports creating, reading, updating, and deleting data using JSON-formatted requests. The current version of the API is v2.
Request/Response Format
All data exchanged between clients and the API is in JSON format over HTTPS.
Please note that only application/json is accepted as the content type, and any request body must be JSON-encoded.
API Testing Tools
You can use third-party tools to test API endpoints before integrating them into your application. For example, Postman is a GUI tool that allows you to make API requests. It is very useful for learning the Wodely API or testing requests while building your implementation.
JSON Date-time Format
All date-time strings in the API payload and response messages are in the JSON ISO 8601 format and are in the UTC time zone. You may need to convert these values to your local time on your system.
Support
If you have questions about using the API, or have come across a bug you'd like to report, submit a ticket through your Wodely admin dashboard.
Terms of Service
By accessing or using our APIs, you agree to the Wodely APIs Terms of Service.
API Key
All requests must be authenticated with an API key from your organization. You can generate API key on the "Settings - Integration" page in your admin dashboard. Ensure your API key is kept secure: do not share it with anyone outside your organization and avoid including it in publicly accessible source code.
Authentication
The API is secured with HTTP Basic authentication. While making a HTTP request, you must put your 'API_KEY' value with Authorization attribute in the request header.
The HTTP request must include a header field in the form of Authorization: Basic {API-KEY}, where {API-KEY} should be replaced with your API key string.
Testing Your API Key
The HTTP GET request must include a header field in the form of Authorization: Basic {API-KEY}, where {API-KEY} should be replaced with your API key string.
General Quota Limits
The following quota limits are set for Web API and Webhook integration per organization account:
| Subscription | Quota Limits |
|---|---|
| Starter Plan | API integration is unavailable. |
| Professional Plan | Maximum 150 requests per minute; Maximum 10,000 requests per day. |
| Enterprise Plan | Unlimited requests for clients with dedicated web server and database. |
Exceeding Quota Limits
If you exceed the quota limits, you will first receive a 429 error. Failure to slow down your request rate may result in a temporary ban. If your application consistently make a high volume of API requests (for example, exceeding 10,000 requests per hour), it will take additional necessary actions to protect our system’s stability and reliability from the impact of excessive API polling. For example, the IP address of your system may be temporarily blocked from accessing our public API server.
API Throttling
To stay within the API limit, we strongly recommend that you use a library to help you orchestrate your request rate. Few guidelines on how to avoid making too many API requests:
- If possible, use webhooks instead of polling for state changes. (Webhooks can be set up on the admin dashboard under settings – notification page)
- When creating many tasks, use the batch endpoint if possible.
- If it seems like you’re making many requests for a simple operation or finding many entities to locally scan for a single one, it’s possible you’re using the API in an inefficient way.
When a request is successful, you will receive an HTTP 200 response code or another 2xx code. The response body will contain the JSON data for your request. When a request encounters an issue, the API will respond with a non-200 status code. To provide better insight into the problem, the API uses various HTTP error codes. Additionally, it may include JSON data in the response body, offering your application detailed information on what went wrong.
HTTP Response Codes
Our API uses standard HTTP response codes to indicate whether a request has been successfully completed or encountered an error.
| Error Code | Meaning |
|---|---|
| 200 OK | The request has succeeded. |
| 400 Bad Request | Invalid request or other errors. |
| 401 Unauthenticated | Missing API key or invalid API key. |
| 429 Too Many Requests | Too many requests within a given time frame or reached the daily quota limit. |
| 5XX Service Unavailable | The server is not able to handle the request or other errors. |
All date-time strings in the payload and response messages are in the JSON ISO 8601 format and are in the UTC time zone. You may need to convert these values to your local time on your system.
All date-time strings in the payload and response messages are in the JSON ISO 8601 format and are in the UTC time zone. You may need to convert these values to your local time on your system.
To search for historical completed tasks, you must set "taskStatusId": "50" in your payload body. The status ID 50 indicates the task status is completed. The system uses the user‑provided startDateTime and endDateTime to find completed tasks based on their completion timestamps.
Pagination: When all search results fit in a single batch, the lastId field in the response will be an empty string. If the results exceed your specified limit, the response will include a lastId value. To retrieve the next batch of tasks, include this lastId in your next request.
The system will return the records that come after that ID. To retrieve large number of records, you may implement a loop that checks the lastId value in each response. If lastId has a value, use it in the next request to fetch the following batch. Ensure you enforce a maximum number of iterations to avoid a potential deadlock loop.
Updating the task status through this endpoint will automatically trigger the predefined webhook in our system to send messages or data.
Webhooks are one way that our system can send automated messages or information to other apps when something happens. It is designed for your application to be notified of important system events, as soon as these take place within Wodely. For example, when driver complete a delivery job on Wodely platform, it sends a real-time JSON message to your in-house system to update the order status to completed status.
How to set up webhooks?
To use the webhook feature, your system needs an endpoint to receive real-time delivery task updates from our system. This endpoint is known as the Webhook Callback URL. You can also use a third-party system to receive webhook messages if needed.
To create a webhook in our system, log in to your admin dashboard and navigate to the "Settings - Notifications" page. Click on the "Add Notification Rule" button at the top-right side of the page, then select the webhook method (HTTP GET or HTTP POST) from the drop-down menu.
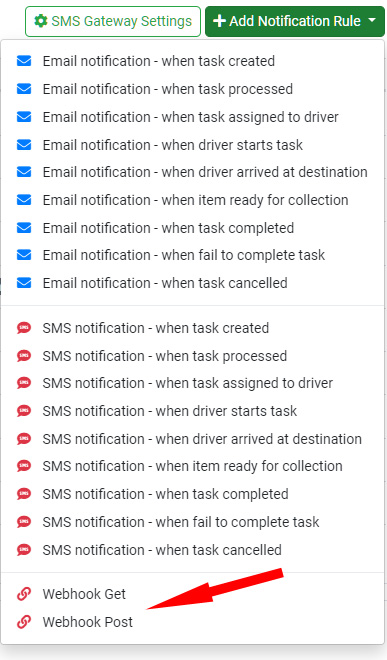
Webhook Trigger Events
The following events can be used to trigger a webhook message to be sent to your system:
| Webhook Event |
|---|
| When new task is created (unassigned status) |
| When task is assigned to a driver |
| When task is processed |
| When packages loaded to vehicle or picked up |
| When driver starts task (transit status) |
| When driver arrived at destination |
| When item ready for collection |
| When task completed successfully |
| When task is failed |
| When item returned to sender |
| When task is cancelled |
Webhook Message Sample
If you choose the "Standard Task JSON Data" option on your webhook setup, the webhook will send the Task object to your system. Here is a sample JSON data structure:
Warning: To stay within the API quota limit and use resources efficiently, we recommend using webhooks instead of API polling for monitoring state changes of delivery tasks. Avoid sending large number of repeated requests to this endpoint for status updates, as doing so will result in your IP address or API key being temporarily or permanently blocked.
Warning: To stay within the API quota limit and use resources efficiently, we recommend using webhooks instead of API polling for monitoring state changes of delivery tasks. Avoid sending large number of repeated requests to this endpoint for status updates, as doing so will result in your IP address or API key being temporarily or permanently blocked.
Timeout Risk: Because the task creation endpoint relies on an external service such as the Google Maps API for address geocoding, creating 100 tasks in batch may take more than 30 seconds to complete. If your HTTP request has a short timeout configured, you may receive a timeout error even though the tasks are successfully created. If this occurs, consider reducing the number of tasks in each batch.
There is a limit of 100 tasks in the body per request for this endpoint. If your request contains more than 100 tasks, please split it into multiple requests.
There is a limit of 1000 tasks can be created per minute. The task creation process relies on external services for address geocoding. This limit exists because those external systems also enforce per‑minute rate restrictions.
All date-time strings in the payload and response messages are in the JSON ISO 8601 format and are in the UTC time zone. You may need to convert these values to your local time on your system.
Bulk update requests support up to 2000 tasks per request for security and performance reasons. If your request contains more than 2000 tasks, please split it into multiple requests.
Not all task fields are supported for bulk updates. Refer to the FieldName section to see which fields are allowed. Each field has its own requirements and accepted values. For full details, see the Request Body Parameters section of the Update Task endpoint.
All date-time strings in the payload and response messages are in the JSON ISO 8601 format and are in the UTC time zone. You may need to convert these values to your local time on your system.
To use the route features and API endpoints, you need to enable the Multi‑Route Planner add‑on on your account. You can activate it from the Extensions page in your admin dashboard.
All date-time strings in the payload and response messages are in the JSON ISO 8601 format and are in the UTC time zone. You may need to convert these values to your local time on your system.
Only routes in Pending or In Progress status can be updated. Once a route is marked Completed, it can no longer be modified.
Only routes in Pending status can be deleted. Once a route is marked Progress or Completed, it can no longer be deleted.
To fetch a specific route, include its Route ID in the search parameters. The API will always return the result as an array of routes.
This endpoint returns only the route details. It does not include the tasks contained within the route. To retrieve all tasks assigned to a specific route, use the List Tasks API endpoint and provide a Route ID in its search parameters.
To add or remove multiple tasks, enter the Task IDs as a comma‑separated list (for example: 6320AE1096,E96CB4F5D6). The system supports adding or removing up to 300 tasks in a single request.
When this endpoint is used to add or remove tasks from a route, the system automatically updates the task status, time window, and user assignment according to the route’s settings. No additional API calls are required to update these fields.